%20(2000%20x%201000%20px).png)
%20(1).png)
%20(1).png)
%20(1).png)
Search Results
428 results found with an empty search
- Jesus is King ~ Art Project with Printable
The feast day of Christ the King always falls on the last Sunday of ordinary time, before Advent begins. On this day we celebrate Jesus as Creator, Savior, Head of the Church, and Ruler over all the Nations! This truly makes Jesus King of the Kings! Although His throne does not sit upon the Earth, He will remain King over the world for all time. Praise be to Christ the King! I created this simple art project for my kids to make for this wonderful feast day, and I thought I’d share it with all of you: You will need: Jesus is King printable (Download below) green and white crayons Pencil or a black crayon 6 to 7-inch lid to trace a circle blue paper black paper scissors glue stick glitter/glitter glue, sequins, and/or gems (all are optional) Print out this free printable: Trace or draw a 6 to 7-inch circle on the blue paper using a pencil or black crayon. Use the green crayon to add some green to the circle to make it look like the earth. Don’t be too picky about this since most of it gets covered by Jesus. Cut out the images and “Jesus is King of the whole world!” words from the printable sheet. Glue down the earth, the Jesus image, and saying as shown above. The children can “crown” Jesus now if you wish or say a prayer and have them all “crown” Him all at the same time. Use the white crayon to add dots for stars on the black area around the Earth and the letters. It will look similar to this one above. Stop there or you can take it a step further: Have the kids decorate the crown with glitter/glitter glue, sequins, or gems. Jesus Christ is King! And may God bless you all! ~Jen-Marie
- Easy Advent Wreath for Kids {St. Lucy's Day Wreath, too!}
As I was sitting at my dining room table making my Advent seasonal plans and I came up with this idea for my girls to make for St. Lucy’s day. After creating one, to test my idea, I thought, “Duh!! I feel sooo silly…This is a nice easy activity for the kids to make their own Advent wreath.” — You see I’ve had a destructive, yet cute, baby in the house for the past 14 Christmases and I have never had a real Advent wreath to sit on our dining room table. So this paper wreath is as close as we have ever gotten to having one! Sounds silly I’m sure, but that’s just how it’s been! I just never thought to much about it till this year! This Advent wreath is super easy, all you need is colored paper, scissors, glue, and tape or staples. Because I originally planned to make this a St. Lucy’s wreath, the colors are different in the pictures than they are for the Advent wreath. Cut out two strips of green paper. We cut ours in a zig-zag type pattern, to give it more of a wreath look. Staple/tape the two strips together at the ends to create a circle. Cut 3 tall rectangles out of purple paper and one tall rectangle out of pink. (or, as pictured, cut 4 white for St. Lucy) Staple/tape them to the wreath. They are the candles. Now draw four teardrop shapes on yellow paper and add a little orange to the bottom to make it look like a flame. After cutting them out we drew orange flames to the other side, too. Staple/tape one flame to the top of the correct colored candle throughout the weeks of Advent. Cut out circles from red paper to make berries. Use glue to add them to the wreath. We used the berries to cover our staples. It worked well! My little “test subject” was so excited about the cute little wreath-hat! She didn’t want to wait till the 13th (St Lucy’s day) to make them and that was okay, because she was just as happy to make one for the start of Advent as an Advent Wreath! I’m sure my girls will have just as much fun making them again to wear on the 13th, too! Cheers to happy kids! 😉 God Bless. ~JenMarie
- 10 Ways to Use and Decorate with Saint Medals
I love saint medals! I kind of have a collection. Funny thing is, I always wear the same medal around my neck -24-7. My mother gave it to me when I was about 8 and I’ve worn it since. The rest of my medals are in a box packed away. But I decided it’s time to make use of some of them, and I thought I’d share a few of my ideas with all of you. Perhaps something will inspire you. 1. Use Medals as Zipper Pulls They could be used on purses, coats or jacket zippers. 2. Ceiling Fan Pulls A few months ago one of our ceiling fan pulls was accidentally hit. It swing up and hit the light fixture breaking the glass. So I removed all the heavy pulls that came with the fans and replaced them with light-weight saint medals. -No more broken light fixtures!! 3. Curtain Tie backs Use them to decorate your curtain tie backs. 4. Decorate Candles I found this idea on Pinterest. -from DustyLu And this is from Tiffany at Family at the Foot of the Cross 5. Use them to decorate gifts and cards 6. Decorate Baskets 7. Hang them on your key chain 8. Hang them on the ring that keeps your kids flash cards together 9. Hang them on spiral ring notebooks 10. Use them to create a bookmark (with two medals and a ribbon) These are all great ways to have a constant reminder of God and the way we should live. The images of the saints can speak of their story even when we are just doing our daily duties. Do you have another idea on other ways to use and decorate with saint medals? Feel free to share your idea in the comment area. God Bless. ~Jen-Marie
- Advent Tree {PREPARE}
Just wanted to share a cute Advent idea! This year we decided to decorate our tree for the Advent Season! Our tree is decked out all in purple: purple balls, purple bows, and purple tinsel! I also made large purple letters to hang on the tree. The letters spell “PREPARE”. (I know they kind of look white in the picture, but they are purple.) Why Purple? Well, purple is the color of sacrifice and preparation. And that is what Advent is all about – preparing yourself for the coming of Christ! One great way to prepare yourself is through sacrifice! Maybe doing extra things to help others or giving up a favorite food! So yes, Advent is really about prayer and sacrifice, not celebration! We as Catholics are meant to start celebrating the coming of Christ on Christmas, not before. I know that’s hard, we struggle, too! But it’s a challenge I feel is important to help us build a stronger relationship with God. Since the Christmas season doesn’t actually start till Christmas, I thought this Advent Tree idea was a perfect idea for our family. I first learned about this Advent tree idea at Tracy’s blog “ A Slice of Smith Life “, hop over and visit Tracy. She has a great blog! The kids love our Advent tree! I even bought pink ornaments to add to the tree for the third week of Advent. We plan to redecorate our tree Christmas Eve, and cover it with our typical silver and gold star-shaped ornaments! But for now we wait and prepare for the coming of Christ! Click here to read more about our Manger. Hope you are all having a blessed Advent! ~Jen-Marie
- Our Lady Of Guadalupe Mexican Flower Craft
Our home is all decorated for the Feast of Our Lady of Guadalupe! We made Mexican flowers from tissue paper and added an image of Our Lady to the center of each. These flowers proved to be very versatile decorations! You will need: 2 to 3 colors of tissue paper 2 to 3 twist-ties tape a small image of Our Lady of Guadalupe (Download below) scissors Download Image and Instructions Here: Cut the tissue paper into different sized squares. We made the largest about 12″ by 12″ and the next was about 8″ by 8″ and the third 4″ by 4″. Fold each square like a fan. Use a twist-tie to tie the middle together. Unfurl the fanned sides and tape the edges together to form a circle. Do this for all your colors. Layer the three tissue paper circles together, by sticking the twist-tie of one through the center of the one larger. Twist all the ties together in the back. It will look layered like this: Now cut out your Our Lady of Guadalupe image, as shown, and tape it to the center of the flower. Note: My older kids (ages 8 and up) could make these with ease. But my younger kids needed more help particularly with the twist-ties and opening the fan. How did we use them? My girls wore them in their hair! Or on a hat! They look great around our statue! And on our bulletin board! Blessings to you and your family on Our Lady’s Feast day! ~JenMarie
- Wisemen Adventures ~ Day 20 to 22
Our little Wisemen adventurers have been searching long and hard to find baby Jesus and we are about to finish up the search! This is our Elf on the Shelf Alternative: If you missed the first few post click here to learn the whole story! Searching for Jesus ~ Day 20 Caspar is at it again. He’s having fun when there is searching to get done! Balthazar and Melchior are working hard to find the infant Jesus in our toilet paper roll basket, but Caspar’s silly fun-loving side just made a slide out of the toilet paper! Searching for Jesus ~ Day 21 When entering the doll house the Three Kings first had to determine if the baby in the high chair was or was not the Infant King they were looking for! Once they came to the conclusion that the baby was just a regular baby, Balthazar and Melchior began to search the doll house for clues as to where the true Infant King was located. Caspar decided to sit at the table and have a party with his new friend, “baby”! Yes, this was my personal favorite day (after the ceiling fan catastrophe ) But if you have been following my blog for awhile you know that I collect dollhouse miniatures. So that made this one more fun for me! 😉 Searching for Jesus ~ Day 22 A grand thought occur to them!! GOOGLE!!! Google has all the information in the world! So they hoped over to the computer and began a Google search! Caspar used his staff to type the letters and Balthazar and Melchior told him what to type! “Star of Bethlehem” -No that didn’t help… “Where’s the new born King?” -A Stable! Who would have thought! Okay, I think they got all the information they need! Maybe they will actually find him tomorrow! Blessings till then! ~Jen-Marie
- Epiphany Pumpkin {What was I thinking!!}
This is probably one of my worst ideas!! We had a pumpkin sitting here since thanksgiving and I had no desire to cut it up and cook it, but my daughter was begging me to cook the seeds. She just loves pumpkin seeds! 😀 So with Christmas in our midst, I decided it would be fun to use the pumpkin in a Christmasy fashion! So here is our Epiphany Pumpkin! 😉 After Elizabeth dug out her yummy seeds, I carved a star into the pumpkin and she painted the pumpkin with black acrylic paint. While the paint was still wet we sprinkled it with gold glitter. It looked so pretty, the pictures don’t do it justice! At night we added a tea light and our wisemen. Ya, it's a goofy idea, but she had fun and it was a perfect way to use our leftover pumpkin at Christmas time! 😉 God Bless! ~JenMarie
- The Christian Alphabet Book Review
My younger children are at the ”alphabet learning age”. So when I was asked to review the book by Tracy Sands I thought it might fit in well with my lesson plans for the school year. I was a bit surprised when the book showed up at my door since it was not what I was expecting. Many younger kids like stories or rhyming poems. This book is not an easy read book and you cannot sit down and read this book straight through to your child(ren). I found a page (a letter) a day to be plenty for kids to handle. Plus, each page/letter needed discussion time and/or activity time to reinforce the thoughts and ideas. is meant to teach about Jesus, prayer, and the Bible. Each letter is used as a spring-board to teach children many different simple religious concepts. These ideas are very basic and easy to understand, but coming from a Catholic perspective this book is kind of disappointing. This book IS CHRISTIAN. While I saw nothing wrong with the information in the book, I personally would have loved to see more in depth Catholicism in the book’s teachings. I did see many Catholic symbols and ideas peaking through some of the teachings and images, which makes me think the author/illustrator is or was Catholic. I can see that this book would work well as a teaching tool to reinforce religious concepts as children learn their letters. Although, I personally would add a more Catholic twist to the information given. Also, it could be used as a discussion starter when teaching kids of many ages. From an artistic standpoint I thought the letter images were beautiful. The author/illustrator, Tracy Sands , did an awesome job making the images look interesting. Although many of the letters were not easy for my younger kids to make out, the kids did have fun trying to find the letter shape in the picture. My kids enjoyed the ”Seek and Find” section under each letter image, too. Personally, I found the ”Symbology” section in the back of the book particularly interesting. You can see some of the information on the image’s symbolism and it’s meanings here on their website. I was also sent a CD which included 5 songs, including the Christian Alphabet Song . If you feel having a song to go with the book would be helpful than this is an added bonus. Although, the CD only has 5 songs, it is reasonably priced. Visit website to read more about this book and the other items they sell. NOTE: I was given a free copy of this book and CD in exchange for an honest review. I make no profit from this review. God Bless. ~JenMarie
- The Brown Scapular and Our Lady of Mt. Carmel ~ Crafts Activities and Coloring Pages
My family and I are adamant scapular wearers. From about the age of 7 or 8ish my kids enroll in the Brown Scapular and start to wear a scapular 24/7. If you don’t wear a scapular I HIGHLY recommend it!! To learn more about the scapular click here and here . I also recommend you read these books. These are wonderful books and they have some awesome miracle stories about the brown scapular. You can buy some really pretty scapulars, but they can be kind of pricey. So on our tight family budget I like to go simple and cheap. Here is a great spot to get a FREE scapular ! On the feast day of Our Lady of Mount Carmel (July 16) I like to have a little something for my kids to make, color, or create! Here are a bunch of ideas I found: This is a few past posts from Catholic Inspired: Make an Our Lady of Mount Carmel Felt Doll Click here to see this post Or make this wall scapular craft to decorate your room or home. Here’s more from other websites and blogs: Fun Food for the feast day: Scapular Brownies from Catholic Cuisine Scapular Cake from Catholic Cuisine Coloring pages: Coloring pages from Coloring Book 4 Kids here and here Coloring pages from My Catholic Source here and here More beautiful coloring pages from Hope you see something you can use! Have a blessed day! ~JenMarie
- Easter Gardens and Triduum Displays
I’ve seen many beautiful examples of these little Triduum displays, so I thought you might like to visit a few of these websites and blogs to get some inspiration to make your own. Craft, Interrupted has this fun Easter garden. Here is a neat tomb; it\’s an egg! See this at Toddler Activities at Home Familia Catolica has made clever use of a potato in this garden. Go check it out! The Crafty Homeschooling Mama as a great post about this lovely garden: At the Butterfly Ball made this cute little display. Mary and Joseph\’s Gem has a few pictures of this colorful garden. A Holy Experience has pictures of this garden. Visit The Frugal Homemaker for this tutorial. JOY-filled Family has a beautiful garden, too. Visit Tiffany to see her Resurrection Tomb Terrarium
- Tiny Flowers and Big Vases - What a problem!
My kids love to give me weeds - I mean flowers - during spring and summer! Some days they bring me so many flowers I don’t know what to do with them all!! Most of these floral bundles are tiny and cute. In fact they are so tiny they don’t fit in any of my vases. Most vases that stores sell are large vases for bouquets you receive through a florist. They just don’t work for the little bouquets that my sweeties hide behind their back and try to surprise me with! Really, a 3 inch tall bouquet just falls down into a deep 10 inch vase. It just doesn’t work! So what should I do with the tiny bouquets that are so lovingly given by my biggest, little fans? Maybe I can just secretly throw them into the trash? Oooh, if my young little fan club found out that I was throwing those flowers into the trash I would be in BIG trouble!! The feelings of my little crew would be worse than the way Naomi felt when Joshua fed Prince Charming to the dinosaurs!! Besides, if I did trash the flowers, I’d have to explaining to the little upset faces what happened to the beautiful posies my precious posy pickers picked! What to do; what to do! My solution: Votive candle jars! Many small votive candle jars are a nice size for my tiny bouquets of flowers!! This past spring, while I was at a yard sale, I found a set of 5 votive candle jars which were held in a small shallow basket. These have been working GREAT for holding my petite perfumed posies!!! The posy pickers are thrilled to fill up all 5 jars. I display the jars with their basket and my statue of the Blessed Mother and the infant Jesus. I added a few strings of pearls to make it look a little more royal for Our Lady. The pearls really added a nice accent to the basket! It’s been such a joy! Not only do I now have great little vases to display my tiny flowers, I’m also able to share them with my Mother Mary!! Can you get any better than that?!? Here’s another cool thing about it….They are easy to clean!! Love it! It’s nice that my kids can freely bring in flowers to give to Mary! That might be a nice new tradition for teachers to do in the month of May for Our Lady, too! Votive candle jars are easy to find at thrift shops or even a regular store in the candle area. Be creative! I like to think ”outside the box". Now, if I could get my hands on one of these: Click here to see on Amazon I could put a statue of Mary in the middle, where the large vase is. Then add little flowers all around, in the votive candle jars!! That would be sooo pretty! I’d just have to figure out how to add something to the middle to support a statue. Oh, well, just a thought….. Oh, by the way – for any one concerned – Prince charming was able to escape from his hungry captives. He only sustained minor paint scraping and a disappointed Naomi who tossed him down when she realized the doll wasn’t actually hers. It was her sister’s – Abby! What a disappointment! Well, at least Charming got out with all his limbs intact! God Bless you and your family! ~JenMarie
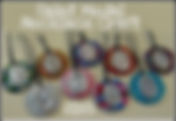
- Saint Medal Necklace Craft {Catholic Teen Girl Fun!!!}
My oldest daughter, Rachel, (age 15) asked to have a sleepover-party with a few of her Catholic friends. She doesn’t normally ask for too much so I really wanted to make this happen. Aside from all our other fun party plans Rachel wanted a craft or two to do with her friends. I came up with two things for the girls to create and I want to share the craft that the girls absolutely LOVED!!!!! My daughters and I all agreed that this craft is ”addicting”! We all just wanted to keep making them!! These saint medal necklaces are perfect for Catholic teen’s parties, youth groups, or even All Saints Day parties! They would also make perfect DIY gifts!!BUT here’s a caution to those interested in making these: Be prepared to make more than one pendant, because no body could stop at just one! To make these saint medal pendants you will need: Saint Medals (no jump-ring is needed) Washers (We used ¼ x 1¼ sized. A box of 100 only cost $1.50 at our local hardware store.) Nail Polish (LOTS of colors – We bought ours at the Dollar Tree) Nail-art glitter or other glitter (We bought ours at the Dollar Tree, also.) Clear nail polish or clear glittery nail polish (A must if you use glitter) String (we used black waxed string we bought at A.C. More) Fun-Tak or other mounting putty (Found at Wal-mart in the stationary section *Or use super-glue if you prefer.) The first thing you need to do is paint a washer with nail polish. This is the fun part!!! Add glitter while it’s still wet, and allow that to dry. Once it’s dry coat it with clear nail polish (or clear-glitter polish) This will help seal the glitter in place. It also just makes it look more finished. Cut a string to the length you desire. We found that 24 inches seemed to work well. Thread the open ends of your cut string through the saint medal hole. Like this: Add the washer to the looped end, like this: Now thread the cut ends into the looped end, like this: Pull it all tight, and keep the cut ends as even as you can. Center the medal in the center of the washer. The medal will pop out as pictured below: Add a small ball of mounting putty to the bottom-back of the medal. Press the medal down against the washer to stick them together. You could super glue the medal down, but I wanted to keep the medals nice in case the girls wanted to change the backing that they painted. It should look like this: As for the cut ends of the string, we tied a loop in one end and a large knot in the other so it can be easily taken on and off. You could buy clasps to attach to the ends if you wish. Here are some of the beautiful necklaces the girls made.(The pictures don’t do them justice! They are so sparkly and shinny!!) The example pictures above are only a few that my daughters and friends created. Yes, these are addicting!!! I have a feeling we will be making more soon!! God Bless! ~JenMarie